Copy and paste a species list
From the “Add data” menu, choose “Paste species lists”. You are then presented with a “My species lists” page. This will show previous lists that you have pasted into Pantheon as well as allow you to add new ones.
To add paste a new species list, click on the “Paste new species list” link. You will be presented with a form that has three text boxes in it. Enter a name in the “List title” – this is a mandatory field and what your sample list will show up as on the “My species lists” page.
The “List description” is optional.
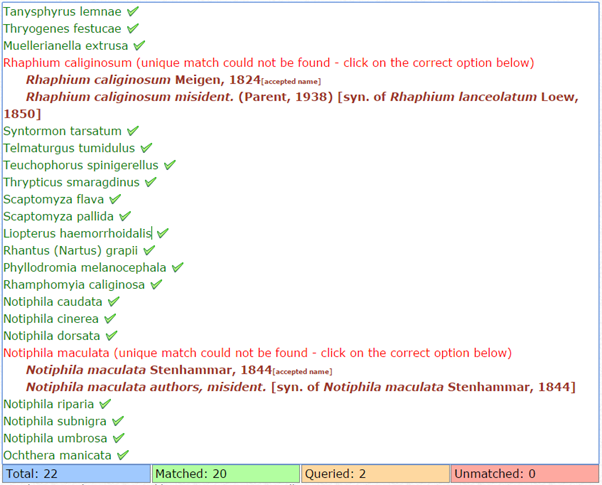
In the “Enter the list of items”, paste in your species list. Scroll to the bottom of the page and click on the “Check” button. This will check the names on your list with the species names within Pantheon. Where the name matches, the text will turn green and there will be a green tick at the end of the name. Where there is no unique match, the text will turn red and suggestions from the Pantheon species dictionary will be displayed underneath. Click on the name that you would prefer to use. If there is no match, there will be a red X at the end of the name. This species will not be used in any analyses.
Pantheon uses the UK Species Inventory (UKSI) for name matching and for highlighting the preferred name. If you disagree with the preferred name or no match is found when you think there should be one, these issues will need raising with the UKSI project team, who are always happy to receive feedback.
Once the species names have been checked, save the list by clicking on the “Save” button. Your species list will then show on the “My species lists” page. There are a number of actions for you to choose from:
- analyse – this will perform the various Pantheon analyses
- edit – allows you to edit your species list
- add metadata – allows you to add metadata to your list. The metadata includes: date, location and grid reference. You can also edit your species list. Please note, if you add metadata and save it then your species list will become public, i.e. anyone logged into Pantheon will be able to see it.
Importing records from a .csv file
For this process your records need to be saved in a comma-separated text file (.csv).
Note that all data imported via this route is publicly visible within Pantheon - you don't get the same choice over making it public that you when using the "Copy and paste" route.
The csv file must contain a minimum of three columns:
- Species
- Date
- Grid reference or other spatial reference
In addition, we strongly recommended you include a location name:
- Location name (not actually required by the upload system, but strongly recommended)
Many other optional columns can be added, see Step 3 below.
IMPORTANT: if your file contains records from a range of dates and/or locations, each time the file changes date, grid reference or location name Pantheon will treat it as a new sample. This means you can end up with a lot of separate samples that each contain one or a very few species. If you want to group your records into a single complete samples for each date/location, then you need to ensure that your csv file has been sorted by date, grid reference and location, prior to importing it into Pantheon.
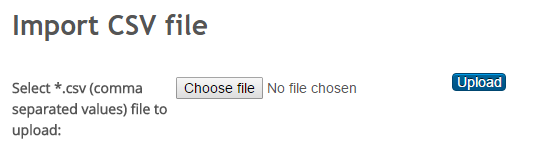
Step 1
To start importing, go to the “Add data” menu and choose “Import CSV file”. Use “Choose file” to specify the .csv file that you wish to import, and the click on “Upload”.
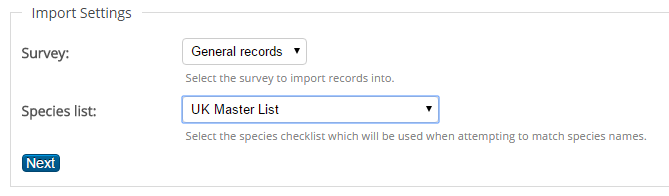
Step 2
Specify which survey and species list you wish to link to – for general species records it is best to choose “General records” and “UK Master List”. Then click on “Next”.
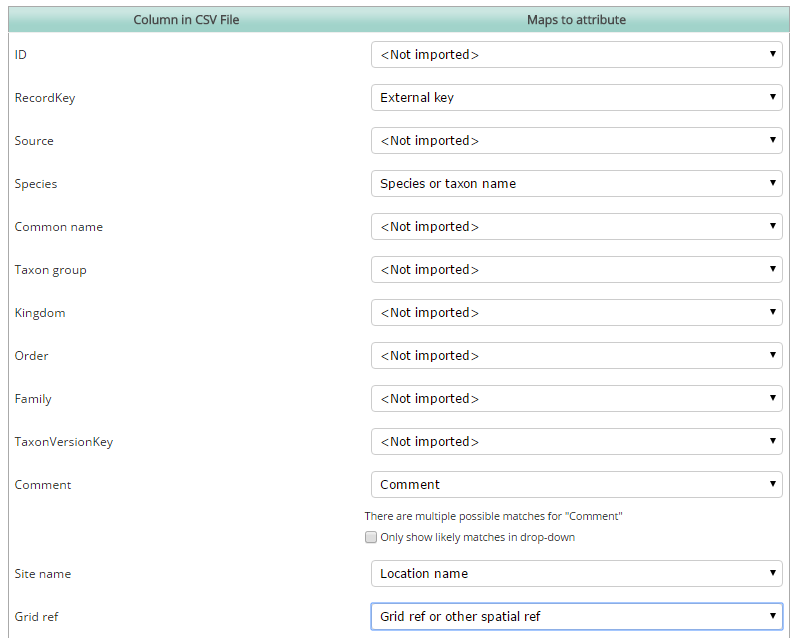
Step 3
Next you need to match the columns in your .csv file to the attribute fields in the Pantheon database. There are a lot of attributes to choose from, and some are not of obvious use for general species records.
The only columns you have to have in your CSV file are as stated above: Species; Date; Grid ref; Location name. All other fields are optional and are not needed to generate the Pantheon analyses (there is ongoing discussion about whether Pantheon should be used as a route for contributing records to recording schemes – if records are being contributed then some of these additional fields will be needed).
There is a long list of fields that you can use in the 'General records' survey. You are very unlikely to need all of them, and here the ones that are most likely to be relevant:
- Under subhead “Occurrence”:
- Comment [can be any text comment associated with the individual record]
- External key [if the data you are importing has unique IDs associated with each record it is recommended that you import the unique IDs into this External key field]
- Species or taxon name
- [Subhead “Occurrence media” is to do with importing images or other media files, and can be ignored for standard records]
- Under subhead “Occurrence custom attributes”:
- Identified by [the determiner for the record, preferably in format “Surname, First name” – can be left blank if the recorder determined the identification]
- Quantity [can hold numbers or text]
- Under subhead “Sample”:
- Comment [can be any text comment associated with the sample as a whole]
- Date [in dd/mm/yyyy format, or as a vague date such as “2015”]
- [There are other date fields that should allow for things such as date ranges, but these are not currently fully implemented]
- Grid ref or other spatial ref
- Location name
- Under subhead “Sample custom attributes”:
- Recorder Name [preferably in format “Surname, First name”]
Use the “Not imported” option for any column in your CSV file that you can’t find a match for, or don’t want to import. Here is an example of some data columns being mapped to attributes in preparation for import (only some columns shown):
Once you have mapped all the columns that you wish to import, click on the “Upload” button at the bottom of the screen.
If all has gone well you will see a progress bar and then a message telling you that your data has uploaded successfully. If you have uploaded records for several dates or locations they will be treated as separate samples – there will be a Pantheon sample for each unique combination of date, site name and grid reference.
You can view the uploaded data via the “Explore” menu.
Manually adding each species
From the “Add data” menu, choose “Enter records”. This allows you to enter a species list for a site on a date, and you can optionally include recorder and determiner names, quantities and a comment for each species record. Each species list you enter will be treated as a separate sample for Pantheon analysis.